If you were to ask 10 different people how to swing a golf club, you would get 10 different answers, and things would get really complicated really quickly. The truth is, there is no simple answer to the question.
In 1997, after winning the Masters by a historical margin, Tiger completely reinvented his swing. He did the same thing 2 more times in 2003 and 2013. If the best player in the world and maybe the best golfer ever has to revamp his swing consistently, it only makes sense it is a complicated thing.
The problem with complicated questions is that, too often, we respond with complicated answers. If you were to listen to every piece of advice about your golf swing that you are bound to receive, you will never be able to get out of your own head.
The golf swing is an athletic move, not a robotic one, and too much information can strip your swing of the athleticism it needs to succeed. It is like watching a big man in basketball who has all of the technique but none of the athleticism.
For simplicity sake, we like to breakdown how to swing a golf club into 6 key areas:
- Setup
- Takeaway
- Turn
- Downswing
- Follow through
- Finish
My goal in writing this is to help you learn how to swing a golf club. I will go over some specific instructions and techniques that help you swing the club well, but it is important not to lose your swing in the midst of the advice. I will keep things simple and straightforward with the goal of giving you the tools you need to learn how to swing a golf club.
Setup
Your setup is all of the things that you do leading up to your swing and we like to break it down into 4 main parts; Grip, Aim, Stance, and Posture (G.A.S.P. for short).
If you rush your setup or skip these steps so that you can hit your ball quicker, you’ll never see the consistent results you’re looking for.
Grip
Gripping the golf club is one of those things that we just all assume we can do correctly. We grab the club in the most natural way possible and take our swing. The truth is, there is some validity to that. You want the club to feel natural in your hand so that your swing is as natural as possible. At the same time, there is a reason that probably 90% of PGA Tour pros and the vast majority of amateurs use what is called an overlapping grip. There are 3 types of grips as follows:
-
- 10 Finger – All 10 fingers make direct contact with the club, otherwise known as the baseball grip. Very few people use this one even though for many of us who grew up playing baseball it may be the most natural feeling to begin with.
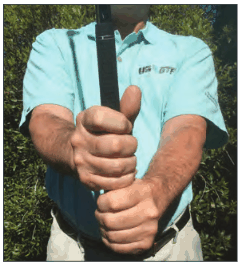
-
- Interlock – You place the pinky of your right hand between the middle and index finger of your left while the rest of your fingers perform the baseball grip mentioned above. You get a little more control as your hands work together while still having a lot of contact with the grip.
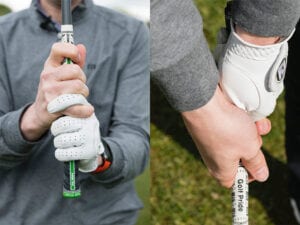
-
- Overlap – As high as 90% of PGA Tour pros and the vast majority of amateurs play this grip. It is perfect for people with larger hands. You place your right pinky between the index and middle fingers of your left hand while your left thumb fits into the grip of your right hand.

The strength of your grip is also an important aspect of play. There are 3 types of grip strength and each of these strengths will affect your swing and the way you play your ball. When you hold your golf club, you can see a “V” shape formed by the index finger and thumb of your hands. The direction that these “Vs” point will also tell you the strength of your grip. Here are the 3 different types of grip:
-
- Strong – A strong grip is when your “V’s” are pointing to the right side of your head. This type of grip will give you a more inside-out swing and help you draw or hook the ball.
- Weak – A weak grip is when your “V’s” are pointing to the left side of your head. This type of grip promotes a fade or a slice.
- Neutral – When your “V’s” are pointing down you have the most commonly used grip…Neutral. This feels the most natural to most people and will allow you to swing the club more naturally.
Finally, in terms of your grip, pressure is very important. If you made a scale from 1 to 10 with 1 being “I’m barely touching the club” and 10 being a death grip, you want your grip to be about a 7. You want it to be firm but not tight, controllable but without tension in your arms and hands. There is a tendency for us to squeeze the club and even more so when situations become difficult. We have to fight that urge and grip the club in a way that allows you to make an athletic movement with all of the feel and control you can get.
Aim
A good way to check your aim prior to hitting a shot is to get in your stance and lay one of your clubs over your quads. The way that your club’s butt is pointing is the way that your stance is aiming. You can also see where you were aiming by analyzing your divots after the shot. It is easy to see if your divot points to the left, right, or center and then you can know if you were aimed in the direction you thought.
Stance
For the most part, your stance is where you place your feet and how you bend your knees getting ready to take your shot. It is important because it helps you hit each of your different clubs well and will vary slightly from club to club. Here are the important things to consider:
-
- Width: How far apart are your feet when you start your swing? This width should allow you to reach the ball easily with proper posture, allowing you to extend your arms for maximum distance but not reaching for the ball. For your driver they should be a little more than shoulder width apart, but when you are hitting your wedges they should be right about shoulder width.
- Ball Position: Consider whether to place the ball forward in your stance or more towards your back foot. The general rule is that the lower loft on your club, the further towards the front of your stance the ball should be. You should play your driver off of your front foot and your lob wedge off of your back. This allows you to hit down on your wedges and through your woods.
Posture
Your posture encompasses what the rest of your body is doing at setup. The key to posture is that you want to keep your swing an athletic movement so your posture has to allow that to happen. You want to have a slight bend in your knees, you will hinge at your hips rather than your back, and your arms will hang naturally rather than trying to make them rigid or bent. To have this type of posture, you have to find clubs that fit you and that allow you to make your swing with these elements of posture in place.
The Takeaway
Think Low, Slow, and Wide
The 3 most important words that you need to learn for a good takeaway are low, slow, and wide…Not necessarily in that order. Many amateurs tend to rush their backswing, some tend to hinge their wrists early, and some slide their body away from the target along with their club. If you focus on keeping the club low, having a good tempo, and a wide swing arc, your takeaway can become the strength of your swing.
You want a wide takeaway because our tendency, most of the time, is to make our swing too steep. A wider backswing gives you a bigger swing arc and more power. If you keep the shaft of your club inline with your left arm, you will have a nice wide start to your takeaway.
Starting the clubhead low actually promotes a wider backswing. You force your hands, arms, and body to stay together in a one-piece swing so that the head stays close to the ground rather than popping up immediately. The opposite of this is the move that you sometimes see golfers begin their takeaway with when they hinge their wrists first. This forces the clubhead up and takes away a lot of your power. You want your wrists to hinge eventually, but not with the first move.
Finally, tempo is also very important here. Many golfers rush their takeaway because it does not seem as important as some other aspects of the swing. In addition, a faster takeaway, in our minds, leads to more clubhead speed. The truth is, if you start your swing with a good slow tempo, you get your whole body behind the shot and you get a wider swing arc that promotes more distance and consistency.
The Club Should Not Get “Inside Your Hands”
When the shaft of your club gets to about pocket level, you should be able to look down and see the club outside of your hands rather than inside and the toe of the club should be pointing straight up into the air.
This is a great video for your takeaway in general, but about halfway through the video there is a description and a great view of keeping the club outside of your hands:
The Turn
Initial Shoulder Turn
If your takeaway is the first part of your backswing, the turn is the second part. The first key to a good pivot (or turn) is that your takeaway was done correctly. By the time your lead arm is parallel to the ground, you should have already started your turn because part of a “one-piece” takeaway is that your shoulders are already turning with your hands.
Lead Arm Parallel to The Ground
Your last step prior to the turn is that your lead arm (left arm for a right-handed golfer) should be parallel to the ground. Your wrists should have already begun hinging and at this point the club should be at about a 90 degree angle from your lead arm. When you get your lead arm parallel to the ground, you start your turn to get the shaft parallel to the ground.
Back to The Target

At the top of your backswing, 2 things should be true. The first is that your back should be facing the target. Your shoulders have made a 90 degree turn at this point with your lead arm following the end of your turn. Your wrists should still be hinged at about a 90 degree angle so that the majority of “The Turn” part of your backswing happens in your shoulders (we are focusing on the upper body as we will focus on the lower body later). Here is a good picture from GolfWeek to show you how your back should be pointed at the top of your backswing:
Perpendicular to Your Spine
At the same time that your back is facing the target, the shaft of your club should be parallel to the ground. This is the top of your backswing. Every part of your body has worked to get your here and it is at this point that you are ready to transition into the all-important downswing. If you come past 90 degrees in your backswing, you are turning your shoulders too far.
A Good Exercise To Help
The turn in golf is actually 2 different movements occurring at the same time. You are rotating your upper body and shoulder while bending at your side.
This link will show you 2 exercises that show the 2 movements separately and help you gain some flexibility in each while at the same time helping you combine the 2 movements into 1.
Performing this exercise will teach your body what the golf turn feels and looks like while promoting strength, flexibility, and balance in your swing:
The Downswing
So far, we have described different aspects of the swing like they are different events. Like you have your setup, then your takeaway, and then you have your turn and at any point in the process only one thing is happening. That is not true. All of these things happen almost simultaneously and are intertwined and interwoven in terms of timing and execution. We can think of them separately and do drills to work on different things specifically, but they are all part of one big thing.
If you are not careful, that phenomenon is especially true of your downswing. In fact, it is not uncommon to see people essentially stop their whole swing at the top and then come down like they are performing 2 completely separate acts. One of the most important things to understand about the downswing is that the backswing and downswing are blended motions, they have different names but they are both parts of the swing and they are very much intertwined.
Your body actually starts the downswing before your club. In fact, for some players, as early as when the club is at pocket level, the downswing starts. That means that your legs, hips, knees, and really your entire body except for your arms have started to shift to the downswing well before the shaft is parallel to the ground. Picture it like throwing a baseball. Even when your arm is going backwards, your body is moving forward so that your weight transfers in time to get as much speed on the ball as possible.
Here is a great video to help you understand this particular aspect of your downswing:
The Follow Through
Your Hands
The follow through includes the moment of impact and leading up to the finish. In the past, it was common to teach golfers to break your wrists and rotate your forearms at impact with a weak grip so that you get a draw/hook spin on the ball.
Today, your hands actually release and you almost “throw” the clubhead at the ball with your right hand while your left hand leads the swing to a wide finish.
Most players want very little face rotation and more clubhead speed at impact. In this video, Mike Malaska shows you what your follow thorough should look like and how to make it happen:
This is an athletic motion rather than a guided motion. What I mean is that you allow your hands to release and your muscles to work rather than trying to stay rigid at impact. When your left arm is parallel in the downswing, your arms and the club make an “L” shape. It is from this “L” shape that you “throw” the club and release your hands so that you finish with that same “L” shape on the other side. Check out this video to get feel for what that looks like:
Cover The Golf Ball
Covering the golf ball is the way you retain your posture and spine angle at impact. When you cover the ball there is little to no dip in your upper body but rather a rotation around the spine.
Most amateurs lose their posture numerous times during their swing. They start too quick, sway too much, and move their upper body way more than they need to.
Covering the golf ball is what pro golfers do so that from setup to impact they are on the same plane and there is less to go wrong with their swing. Here is another video from Malaska Golf to help you understand this concept:
The Finish
If you have ever spent any time watching golf on television, then you know there is one thing that every golfer does on every good shot…they hold their follow through.
You always knew when Tiger hit a good drive because he would hold his stroke at the end of his swing for the full 5 seconds the ball was in the air. At the same time, you knew it was a bad shot when he either dropped the club at the end of his swing or just walked off the tee.
Being able to hold your swing in the finished position shows that you maintained balance throughout your stroke and could balance in that stance for as long as you needed. As a young golfer, you should work on holding your finish after every shot and know that when you cannot, it is probably because you did not have the balance you needed.
A Note on Footwork
Your footwork and lower body mechanics are happening throughout your swing. If you don’t get them right, then you will not get your swing right either. Your lower body provides you with power, with tempo, with timing, and especially with a foundation that allows you to do everything else that goes along with your swing.
There is a lot to talk about when it comes to your lower body in terms of a golf swing, but to keep it simple, I am going to focus on 2 concepts that will help you learn what footwork is supposed to look like.
Pressure vs Weight
When you think about the transfer of weight and pressure on your feet during a swing, it is important to not equate the 2. Your weight is just the mass of your body. You can transfer pressure from one foot to another by moving your mass, but that is not the only way. For instance, when you walk, your mass is constantly moving forward, but the pressure on your feet is not. At some points all of the pressure is in the back foot while at other points all of the pressure is on the front.
The key to your golf swing is moving pressure, not your mass. When you start your backswing, your first move with your feet should not be to sway your upper body over your back foot. Your first move should be to release the pressure from the heel on your front foot causing more pressure to move back while not forcing your body to sway. If you move that pressure back to start with, it will be that much easier to get that pressure back to the front later in the downswing and, again, limiting upper body movement. Here is a great video to describe more the difference between pressure and weight and why it is so important for footwork in your golf swing:
Pressure Pattern
For some reason, when players sense that they are moving too much in their hips or their body is swaying too much, they want to lock things in place. Your immediate idea to correct too much movement is to lock your feet in place and force your knees to remain static throughout the swing. The problem is that, in general, locking things in place removes athleticism. That is especially true if you try to lock your lower body in place during your golf swing.
Your swing should actually have a natural pressure pattern where your feet are moving throughout your swing. There should also be a heel/toe pattern somewhat similar to shifting your weight in a baseball swing. You do not pick your front foot up and step, but you do shift the pressure point from heel to toe. Your first move should be to release pressure from your front heel which places pressure on the back foot. Very early on in the backswing, you should already have the maximum amount of pressure in your right foot, even before your left arm is parallel. When you are at the top of your swing, the pressure on your feet should already be back at about 50/50 while by the time your left arm is parallel in the downswing at least 75% of your weight should already be on your front foot.
Check out this video to get some great diagrams and a breakdown of how your weight and pressure should move and how your heel/toe pattern affects that:
Final Thoughts On How To Swing A Golf Club
The truth is, we know that reading this tutorial and using the pictures and videos throughout will not fix your swing overnight. We do, however, believe that the principles and instructions in this article can teach you the basics of what your golf swing should be. If you practice them and learn them, we firmly believe that your swing will improve and that your scores will go down.
If you used this tutorial to improve your game, leave a comment for us and tell us what the most helpful tip was. Share this link with your friends and tell them how it improved your game. Also, if you are feeling brave, feel free to record your own swing, post it in the comments, and let everyone see what you got.


